- Read the prerequisite mechanic.
- Copy the material flow, not every block.
- Watch the failure checkpoints.
- Adapt the shape to your terrain.
Blueprints hub
Sandustry factory blueprints that explain the “why”
These Sandustry blueprints and factory schematics focus on material flow, inputs, useful outputs, byproducts, and practical layout decisions. Unless a page explicitly says otherwise, treat each layout diagram as a source-based recommendation—not as a benchmarked optimal build.
Before you copy a layout
Use each blueprint as material-flow advice first. A good copy preserves the input, output and byproduct paths even when the terrain changes.
| Question | Why it matters | What to do |
|---|---|---|
| What problem does it solve? | A Gold layout, Water setup and byproduct route fix different bottlenecks. | Skip layouts that target a different failure than the one you can see. |
| Do you have the prerequisite system working? | A layout copied onto unstable Water, Wet Sand or transport will inherit the same failure. | Stabilize the support loop before adding more machines. |
| Can your terrain support the material paths? | Shape matters less than keeping input, useful output and waste separated. | Adapt spacing and direction while preserving the flow logic. |
| Are you expecting a benchmark? | Source-based layouts explain structure, not guaranteed output rate. | Measure your own run before treating a layout as optimized. |
Starter Factory
A minimal, readable first-factory concept with separate input, Gold and Residue paths.
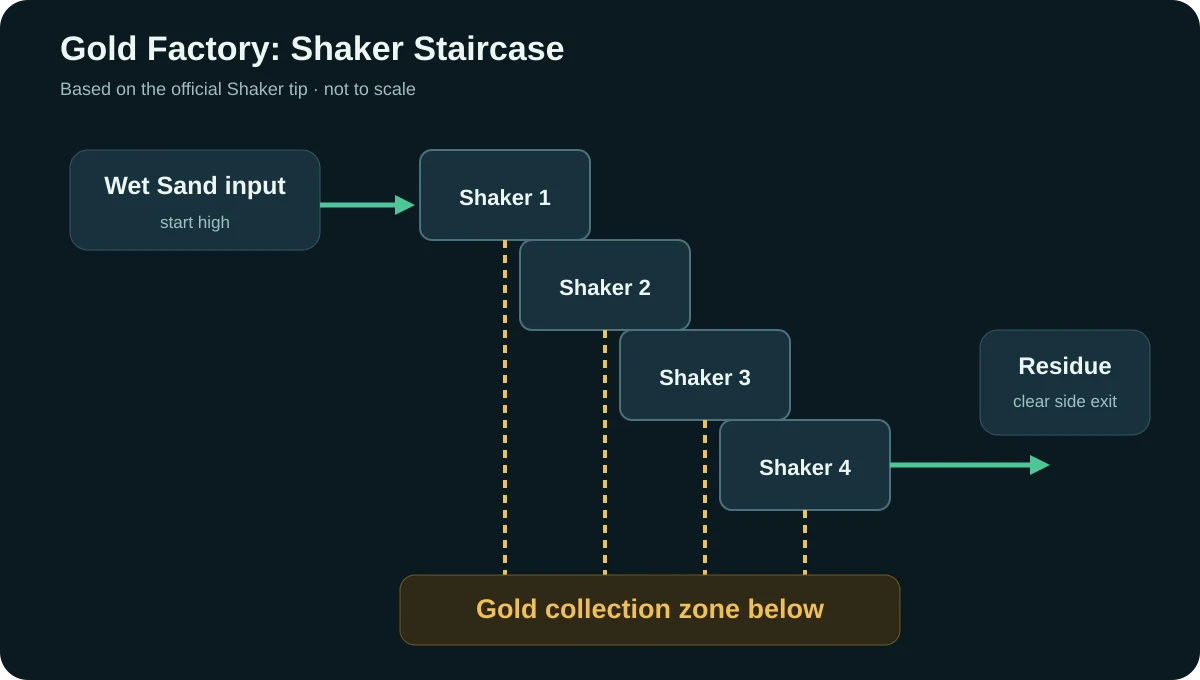
Gold Factory
A Shaker staircase diagram based on the official Shaker recommendation.
Compact Gold Factory
A tighter source-based Gold line structure for small early bases.
Water Handling
A conceptual containment and mixing layout based on official Water behavior.
Early Water Setup
A short contained route from Water source to Wet Sand production.
Residue Handling
Keep byproducts from burying your Shaker and downstream lines.
Adapt a blueprint to your terrain
Copy the material logic first: where input enters, where useful output leaves, and where byproducts are allowed to go. Shape, spacing and transport can change as long as those paths stay visible and separate.
Keep the critical machine stage readable from input to output.
Leave inspection space around byproduct exits.
Move Water or Wet Sand production closer before increasing supply.
Record game version before calling a layout tested.
Pick the layout by bottleneck
A blueprint is most useful when it targets the exact system that is failing.
Water or Wet Sand is unstable
Use the Early Water Setup first, then return to Gold layouts once the input stays wet.
Open Early Water SetupThe Shaker line is hard to inspect
Use a Gold Factory layout when the problem is separation of input, Gold output and Residue.
Open Gold FactoryResidue keeps covering useful flow
Use the Residue Handling page before increasing Wet Sand input.
Open Residue HandlingWhen a copied layout stops working
Most copied builds fail for one of three reasons, and each is fixable before you tear everything down.
The layout stalls a few steps in
A layout does not work on a broken foundation. If the Water or steam loop behind it is not stable, no arrangement of machines on top will hold — fix the loop first.
The copied build does not fit
Your terrain and base size differ from the one the layout was shared for. Adjust the shape to what your map provides instead of forcing the exact copy.
It solves a different problem
A layout optimizes for one bottleneck. If it targets machines you are not using, it will do nothing for your line. Match the layout to the material flow you actually have.
Source note: Use the linked source for the underlying reference. Early Access details can change.
Official source